DTF Film, Ink and Powder: Why the Problem You See Is Almost Never Where It Started

A shop switches film supplier on a Tuesday. Same ink, same powder, same press, same garments, same operator. For four days nothing looks different. Then, on a large back print, the powder starts clinging to the clear areas outside the design, and a wash test comes back with lifting at the edges that was never there before.
The instinct is to fix it where you can see it. The powder is behaving badly, so the powder area gets attention — the shaker is cleaned, the powder is sieved, a new bag is opened. Nothing changes. Someone tries lowering the press pressure, then raising it. Also nothing. Two weeks later the answer turns out to have been sitting in the film's coating all along: a batch with a slightly different surface condition, which changed where the ink sat, which changed where the powder could stick.
The frustrating part is not that the answer was hard. It is that the answer was upstream of everything being adjusted.
This article covers how film, ink and powder hand off to one another, which link is responsible for which result, why "use the same supplier" is a sensible habit rather than a physical law, and how to validate a mixed-brand combination with a protocol you can write down, repeat, and compare.
Three things are deliberately out of scope: this is not a buying guide, it is not a troubleshooting manual, and it does not quote temperature, time or pressure values. Those depend on your film, your powder, your equipment and your fabric, and a number lifted from someone else's line will not describe yours.
The Chain Has an Order, and It Only Runs One Way
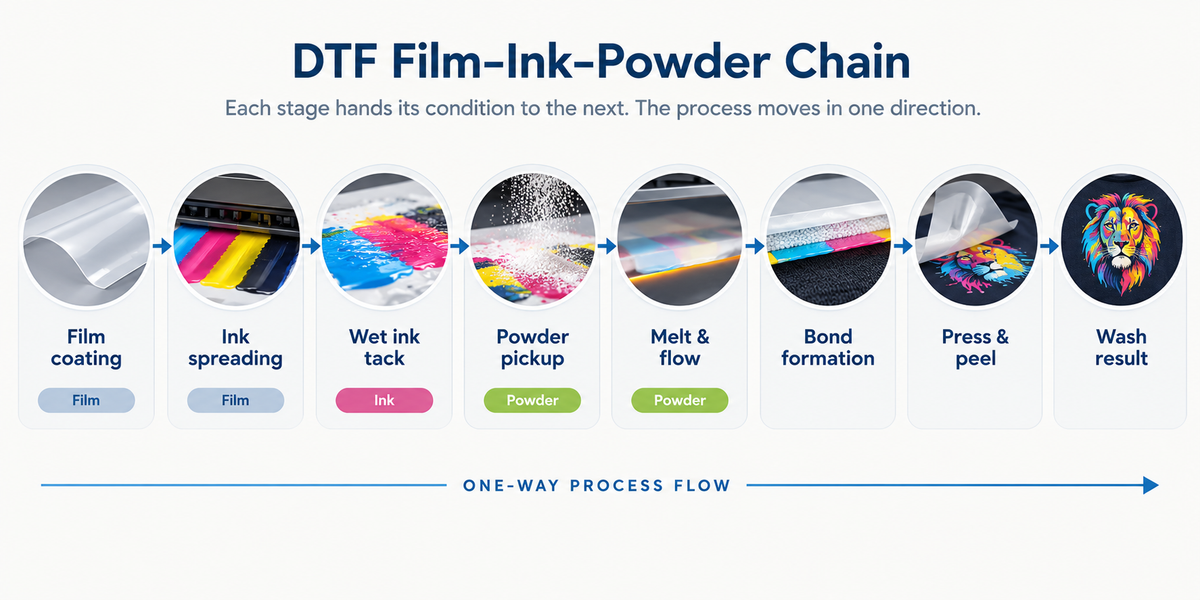
The order is not a convention. It is fixed by the sequence of the process itself: film moves through a printer, ink lands on its coated side, powder is applied to the ink while it is still wet, the powder is cured, the transfer is pressed against fabric, the film is peeled away, and the result is washed. Each stage can only act on what the previous stage handed it.
The chain runs like this:
Film coating surface condition → ink droplet spreading and placement → wet ink tack → powder capture → melt and flow → bond formation → press and peel → wash result.
Read that as a sentence about capability, not a list of steps. The coating determines the surface the droplet meets. That surface determines how far the droplet spreads and how high it stands. How the ink sits determines the area and strength of the wet surface available to capture powder. Where powder is captured determines what the melted adhesive can bond. And the bond is what survives the wash. Every stage narrows what the next stage can achieve. No stage can widen it back.
Spreading is set by surface energy, not by intent. When a droplet meets the coating, the balance between the coating's surface energy and the ink's own surface tension decides the contact angle — the angle the droplet makes where it meets the surface. A low contact angle means it lies flat and spreads wide; a high one means it stands taller and stays contained. Spread too wide and fine detail softens; stand too tall and the ink layer thins, which matters most for the white layer carrying opacity. Neither is a setting you can dial in from the RIP — both are decided at the moment of contact. Published guidance puts the workable surface-energy range in a fairly narrow band, and sources describe that band with slightly different values — a sign of how sensitive the window is, not a number to copy.
Absorption is a balance, and both directions cost you. The coating has to hold ink at the surface while drawing off enough liquid to keep the printed layer stable. Absorb too little and the ink stays mobile, prone to spreading or pooling. Absorb too much and pigment gets pulled down into the coating structure instead of staying on the surface — and since what you see is light reflected off the pigment, less pigment at the surface means less colour coming back. That is why an over-absorbent coating reads as dull rather than weak, and why dullness and pooling are opposite failures of the same variable.
The wet window is a clock, and it runs across the whole sheet. Powder bonds to ink that is still tacky, and from the moment the print leaves the printer that tack is declining. Sources differ on how long the window is — one describes it in seconds, another in about a minute — a signal that it is short and condition-dependent rather than a fixed interval. What matters for diagnosis is the shape of the decay: it happens everywhere on the sheet at roughly the same rate. A problem that is patchy, banded, or confined to one zone of the design was not caused by the clock. A problem that affects the whole print evenly might have been.
What Each of the Three Is Actually Responsible For
The useful question is not which material matters most. It is which material is responsible for which class of outcome.
Film is responsible for where the ink goes and how evenly. Its coating governs droplet placement, ink limit, and consistency across the sheet and along the roll. It also produces the selectivity that keeps powder on the printed areas — the print's own surface condition, alongside static behaviour, is what makes powder stick where there is ink and fall away where there is not. Release behaviour belongs to the film as well. Film is not responsible for how much ink the job asks for — that instruction comes from the file, the RIP and the printer. Film determines what happens to the ink it is given.
Ink is responsible for the surface that captures powder, and for carrying the pigment. The wet ink layer is the adhesive's landing surface. The white layer does double duty: it is the opaque backing that makes colour readable on dark fabric, and it is the surface the adhesive actually bonds to. Because white carries a heavier pigment load than the colour channels, it is both the most demanding layer and the one most sensitive to how well the coating handles it. Ink is not responsible for the physical coverage of the printed area — a weak white that is uniformly weak is a quantity question, while a weak white that is patchy is a placement question, and placement belongs upstream and to the file.
Powder is responsible for the adhesive layer itself — its thickness, flexibility and durability. Once melted, it forms the continuous phase that grips the fibre and holds the print in place. Particle size enters in a purely mechanical way: finer powder sinters into a thinner layer, coarser powder leaves a thicker one, and that thickness is a large part of what the finished print feels like on the hand. Powder grades are described inconsistently across the industry — some suppliers grade by mesh, others by micron range, and the two do not convert cleanly — so grading systems are a naming shorthand each supplier applies differently, not a scale you can compare across brands. Powder is not responsible for whether it was captured in the first place: if it is missing from areas it should have covered, or present where there is no ink, the cause is upstream of the powder.
A note on one common assumption. Powder sticking to the clear, non-printed areas of the film is usually described as a static problem, and static is often part of it. But the print's own wet surface is also what the powder is supposed to prefer. When powder begins choosing the background instead of the design, both are in play, and a film that manages static addresses only one side of that.
Why "Same Supplier" Is a Habit, Not a Law
Search for guidance on mixing DTF consumables and you will find two positions stated with equal confidence, and they do not agree.
One says film and ink must be matched, and that mismatched materials will fail. The other says film and ink do not always need to come from the same manufacturer, and that many professional materials work across different supply systems — provided compatibility is never assumed.
The way to reconcile them is to ask what a supplier's matching work actually buys you. Why using one supplier is a rational default. When a manufacturer develops film and powder as a matched set, they have already done the testing that you would otherwise have to do yourself. They have checked, for their specific formulations, how the coating behaves against their ink's viscosity and pigment load, how their powder responds to their film's thermal profile, and how the combination performs through pressing and washing. Choosing them together is a way of importing that test work into your shop. It reduces the number of unknowns you are carrying, and for most production environments that is a straightforwardly good trade.
It is about risk and effort, though, not about physics.
Why it is not a law. Compatibility is not a property of brands; it is a property of specific formulations meeting specific conditions. Film coatings differ in chemistry, ink differs in viscosity and pigment concentration, powder differs in resin system and melting behaviour. Two products from different manufacturers may align very well, and two products carrying the same label may behave differently between batches. There is no rule that says materials from different companies cannot work together, because there is nothing in the chemistry that would enforce such a rule.
What follows from that is not "mixing is fine." It is that compatibility is an unverified assumption until you verify it — and that the verification is something you are capable of doing.
When mixing is worth attempting. Three conditions make a mixed combination a reasonable thing to evaluate rather than a gamble. The materials should be in the same chemical family, so you are testing a variation rather than a category mismatch. Documentation should exist that you can actually read, so you know what each component was designed to do. And you should be willing to run a single-variable test, which is what the next two sections are about.
If any of those three is missing, the default is the better choice — not because mixing is prohibited, but because you would be taking on risk without the means to measure it.
When the Chain Breaks, Which Link Does the Symptom Point To
Symptoms arrive at the end of the process, but they do not necessarily originate there. What follows is a way to read a symptom back to a link. It is an attribution tool, not a repair manual — each row ends at the question you can answer with a test, not at a fix.
| Symptom | Link it points to | One test that separates it | What the test rules out |
|---|---|---|---|
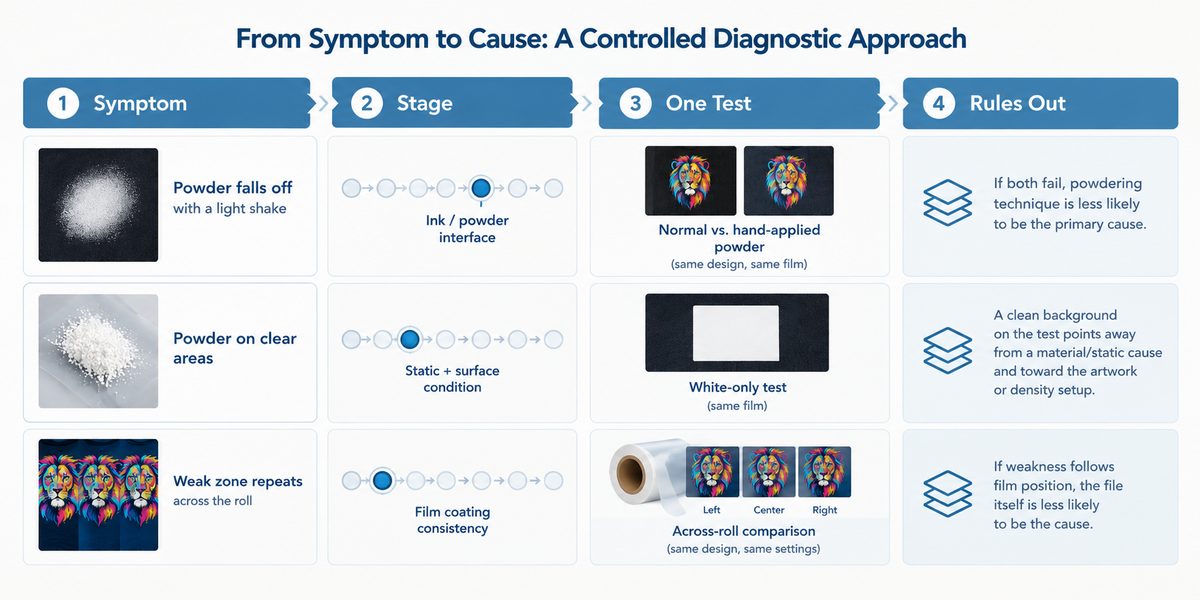
| Powder falls off everywhere with a light shake — barely any sticks to the design | Ink surface condition (ink / film / static) | Print two identical images on one sheet. Process one through your normal powdering step. Powder the other by hand, deliberately over-applying with a brush. Cure and press both identically. | If both fail → the problem is downstream (curing or pressing). If only the hand-powdered one holds → the problem is in your powdering step. |
| Powder looks correctly applied on the film, but the print lifts after pressing | Cure and press conditions (not film or ink) | Same two-sample comparison as above. | The powder and the print surface are exonerated; the fault is in curing or pressing, or in the fabric. |
| Powder clings to the clear, non-printed areas of the film | Static, and the print's own surface condition | Print a solid, heavy block of white only — no artwork, no colour — on the same film under the same conditions. | If the background is clean on this file, the artwork or its density settings are implicated. If it is dirty on this file too, the cause is material or environment, not design. |
| Melted powder looks grainy, sandy or uneven rather than smooth and glossy | Cure conditions, or powder behaviour | Inspect the cured film under raking light before pressing. | Grainy cured powder means the melt never completed — a cure-side question, not a press-pressure one. |
| Cracks appear after washing | Two distinct causes with different signatures | Compare the surface texture of the cracked print with an uncracked sample. | Rough, sandy surface → the adhesive never fully melted. Smooth surface that splits under stretch → the printed layer is too thick or insufficiently flexible. Different signatures, different links. |
| Edges lift or sections detach after washing while the centre holds | Bond continuity across the print — a distribution problem | Compare the failure location with the layout of the print. | Failure at edges, seams and thick areas points to uneven pressure or fabric topography. Failure in scattered patches points to inconsistent capture or cure. Distribution failures cannot be corrected by asking for more ink or more heat. |
| The finished print feels stiff and boardy | Adhesive layer thickness, driven by powder grade | Feel the same design produced with two different powder grades at identical settings. | If hand feel changes with the powder and nothing else, the powder grade is the variable. This is not a film problem and not an ink problem. |
| One area of a design is weak while the rest of the same print is fine, and the pattern repeats across a production run | Film coating consistency across the sheet or along the roll | Print the same file and compare samples taken from different positions on the same roll. | If the weakness travels with the position on the film, the film is implicated. If it stays with the file, the film has been ruled out. |
Two things about this table are worth stating outright.
Several rows share the same test, and that is the point. Bad powder pickup, weak adhesion and cracking can all be interrogated with the same two-sample comparison — one print handled your normal way, one deliberately over-powdered by hand. It splits the process in half at the powdering step: if the hand-powdered sample holds and yours does not, the problem is localised to one operation; if both are equally bad, no powdering technique will help. This comparison is described in supplier troubleshooting guidance, and it is the highest-value habit to build.
Nothing here tells you to change a setting. Knowing a defect originated upstream stops you working at the wrong end of the line. What you do next is a repair question, and repair follows different logic — the step-by-step kind covered in our guide on how to diagnose a failed transfer, which works through symptoms one at a time rather than tracing them back to a position on the chain.
Testing a Mixed-Brand Combination Without Guessing
The one rule that matters
Change a single variable at a time.
If you introduce a new film, a new ink, a new powder and a new garment in the same test and the result disappoints, you finish with four candidate causes and almost no information. A test that changes one material while holding the rest fixed answers a real question: what changed when the film changed? Keep the ink, powder, artwork, curing process, press and garment type as they are, and the comparison becomes readable.
Build one test file and keep it
Do not judge a new combination on a job that happens to be running. Build a small file designed to expose weaknesses, and use the same one every time so results stay comparable across months.
It should contain fine lines, small text, a solid filled area, a heavy white-backed block, a gradient, and a large photographic region. Each element interrogates a different part of the chain: fine lines reveal spreading and edge definition, the solid area reveals coverage consistency, the heavy white block stresses the layer carrying opacity, and the large area shows whether behaviour holds across the whole sheet rather than one convenient corner.
A seven-stage procedure
The stages below combine procedures described in supplier compatibility guidance. Each produces something you can record.
Nozzle check. Confirm every channel is firing before evaluating anything else. Missing nozzles produce banding and uneven coverage that will be misread as a material problem.
Print the standard test file. Same file, same settings, every time.
Inspect the wet print. Before powdering, look for spreading beyond design edges, pooling in dense areas, pinholes, uneven white, and colour contamination. Clean edges and an even layer mean the ink is being received well. This is the only stage where you can observe the ink-coating interaction directly, before adhesive covers it.
Apply and cure the powder. Apply evenly, remove excess, and confirm the powder attached to the print without heavily contaminating the surrounding film. Cured adhesive should melt evenly and come out smooth — if it looks powdery or grainy, the melt did not complete and everything after this point is measuring a flawed sample.
Press and record. Press a garment representative of your real work, and record what you used.
Check the peel. Remove the film by its specified method and examine fine detail, corners and thin lines first — that is where release problems show up earliest.
Stretch and wash. Let the sample cool, stretch the printed area gently, then wash it and inspect again. A combination that passes on the press but fails here has not passed.
Record these fields every time
The procedure collapses in value if you cannot compare one run with another. Record, for each test:
Press temperature, pressing time, and pressure level as set
Garment material and construction
Peel method and peel temperature condition (hot, warm or cold)
Any second press, and its settings
Film batch, ink batch, and powder batch identifiers
Ambient temperature and humidity at the time of the test
The result, in terms you have defined for yourself
That last item matters more than it looks. "Better" and "worse" are not results. Decide in advance what counts as a pass — powder pickup even across the print, a smooth and glossy cured surface, a bond that resists a firm stretch, and a hand feel you would accept on a customer's garment.
The combination validation matrix
One row per test, one variable changed per row.
| Run # | The single variable changed | Everything held constant | Fields recorded | Result against your pass criteria | Conclusion |
|---|---|---|---|---|---|
| 1 | (baseline — nothing changed) | — | Established reference | ||
| 2 | |||||
| 3 | |||||
| 4 |
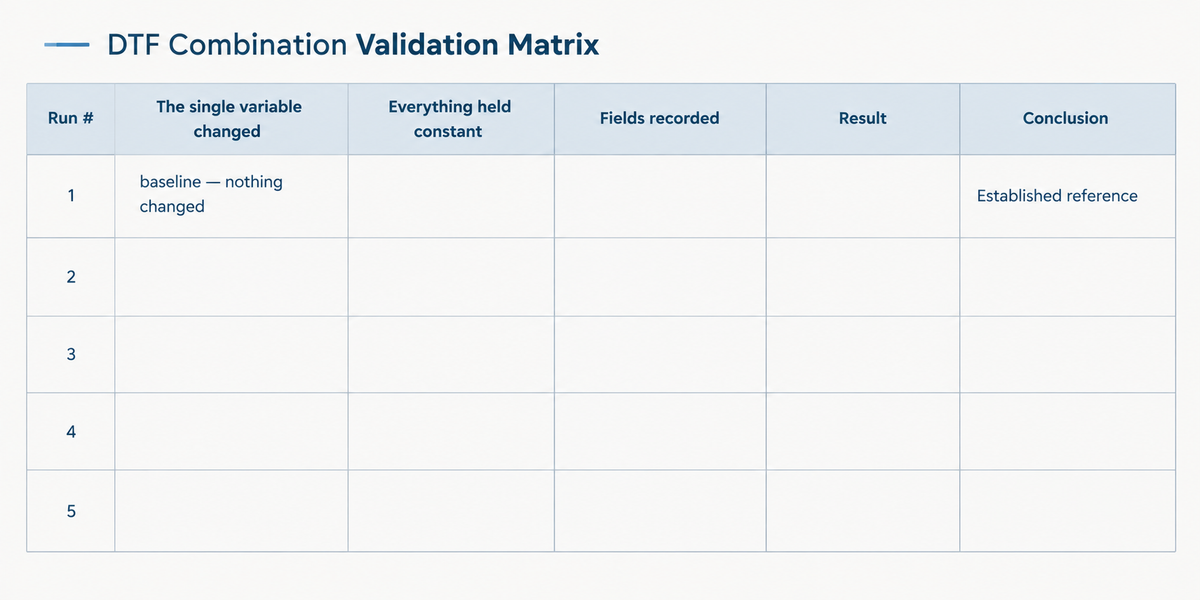
The discipline is in column two. If a row has more than one entry there, the run cannot answer the question you are asking of it. Fill the baseline row first with what you produce today — it is the reference every later row is measured against, and it is the row people skip.
The procedure above is synthesised from published compatibility and powder-troubleshooting guidance from several supplier sources rather than invented here. What differs between sources is what to record and how to judge the result, which is why the matrix exists — it is the piece suppliers leave to you.
Actual settings may vary depending on film, powder, equipment, fabric and other variables.
What the Film Side Can and Cannot Do About It
Three film properties sit inside this discussion.
Coating ink reception determines where droplets land and how evenly they are held, which sets how much powder the print can capture and how selectively. This is the property most directly connected to everything above.
Anti-static behaviour addresses one specific failure: powder collecting on the non-printed areas of the film. It is worth being precise about the boundary, because this is one of the most commonly misread properties on a spec sheet. An anti-static treatment reduces static charge on the film's surface, which reduces how much powder is held onto areas where there is no ink. What it does not do is change the tackiness of the printed area. If powder is failing to stick where the design is, anti-static behaviour is not the variable in play — it acts on the background, not on the print. A film can be excellent at both this and powder capture, but through different mechanisms, and confusing the two leads to buying the wrong solution.
Release behaviour determines how cleanly the carrier separates after pressing, which is why release characteristics show up in the waste bin as much as in the finished garment.
What the film side fundamentally cannot do is compensate for a distribution problem by being asked for more:
A setting changes how much ink the job asks for. It cannot change where, or how evenly, that ink lands.
Ink density in a RIP is one number applied across the whole image. Raising it adds quantity everywhere. Coating uniformity, by contrast, is a distribution property — whether the surface presents the same conditions at the left edge of the roll as at the right, and at the start of a run as at the end. If the coating varies, ink lands differently across the same image, and no amount of ink density will make an uneven surface behave like an even one. A press setting applies the same logic: more heat or more pressure is a uniform instruction to a non-uniform situation.
This is why "just add more white" resolves some problems and quietly fails on others. It answers quantity. Distribution has to be fixed at the source, or worked around by changing suppliers — and the only way to know which you are dealing with is to test in the way described above.
Every film carries a specification and a set of stated capabilities, and it is reasonable to ask for those in writing before you build a process on top of one. What a specification can give you is a description of the surface your ink is about to meet. It cannot replace the test you run on your own equipment, because the test is the only thing that describes your line. If you want a reference point for evaluating films on their construction rather than their marketing, our guide on how to choose the best DTF film covers the criteria in more detail, and the DTF Film Roll specification shows how those properties are documented for a production roll format.
If you are working through a combination of your own and want a second pair of eyes on the fill — the batch notes, the test file, the results that did not behave — send the details of the combination you are evaluating and we will help you interpret what the runs are showing. Film is what we manufacture and stock, and DTF ink and hot-melt powder are available to pair with it on request, so a combination can be assembled and tested as a set rather than sourced from four places.
Conclusion
FAQ
Can I use DTF film, ink, and powder from different brands?
Why does powder stick to the background of my film instead of the print?
How long can I wait to apply powder after printing?
Does anti-static film improve powder adhesion on the print itself?
Contact Us
Tell us your requirements and our team will get back to you within 24 hours.

Ellen Lin
Product Manager & Heat Transfer Materials Specialist
Ellen Lin is a Product Manager at LorinTransfer, specializing in heat transfer materials, DTF printing solutions, and UV DTF transfer products. With hands-on experience in product development and market research, Ellen works closely with manufacturing teams and printing professionals to improve product performance, application methods, and customer solutions. She shares insights on transfer printing technologies, material selection, and industry trends to help businesses make better decisions for their printing projects.
Related Articles
DTF Printing on Dark Fabrics: Isolate the Cause Before You Adjust Settings
A faded print on a black shirt usually gets worked on in one of two places: the heat press, or the white ink settings in the RIP.
DTF Transfers for Print on Demand: A POD Seller’s Sourcing Guide
There is a moment in the life of almost every custom apparel store when the numbers quietly stop working. Orders arrive, designs sell — and the fulfillment receipt still shows you keeping five to eight dollars on a twenty-five dollar shirt.

What DTF Film Can Your Printer Run? Matching Specs by Machine Class
Few purchases fail as quietly as the wrong roll of DTF film. It arrives on schedule, wound neatly on its core, exactly the width the product page advertised — and it does not fit the machine it was bought for.